Blogspot Blog Step By Step guide to the Custom Domain Name Setup
If your blog on Blogspot, and if you use a free Domain's Blogspot I Kruga the recommendation of the Blogspot Free Domain to use the Custom Domain name should be used instead of your own.
Custom Domain name you use in your blog then you will get lots of advantages.
When you place your blog Blogger.com start on, then Blogger.com gives you a free domain. Which looks like this, (Namekblogspotkcom). Blogspot.com/wordpress.com in such domain is the last, such as free domain domain name is called. The thing, custom domain so it looks like this custom domain (name.com). Another Example of Custom domain ShoutMeHindikcom is.
Blogspot blog to your custom domain name setup is a technical part. But even non-technical people in this post custom domain name to your blog can learn how to do the setup.
In this article we complete step by step Guide on how to set custom domain name when the door is in Blogspot, will tell. Easy to follow step by these very methods can setup your Blogspot blog domain name.
 2. This is the place where you bought your domain add up to "+ Setup a 3rd party URL for your blog," Click. Register your domain name and have to add on there.
3. NAME your domain WWW such as the need to add is shown in Screenshot.
2. This is the place where you bought your domain add up to "+ Setup a 3rd party URL for your blog," Click. Register your domain name and have to add on there.
3. NAME your domain WWW such as the need to add is shown in Screenshot.
 4. Once you have your domain Register NAME www click on the save and then you add an ERROR saying "We have been able to verify your Authority Not to this domain. Error 12 .. " will appear and you will see 2 CNAME Record! As is visible in the screenshot.
 5. Now you domain register where you did! There's something to be login to the domain control panel after changing the setting on your custom domain name Blogspot would setup.
6. The next step now is to turn this post where you setup your custom domain name to the Blogspot blog and follow the step to do.
5. Now you domain register where you did! There's something to be login to the domain control panel after changing the setting on your custom domain name Blogspot would setup.
6. The next step now is to turn this post where you setup your custom domain name to the Blogspot blog and follow the step to do.
 2. Next page in the DNS zone file by clicking the Click Add Record.
 3. Add Record Clicking on that will open a new page. CNAME Record Select it, and screen show your Blogspot blogs are here to add to the record. To understand better the view image screenshot.
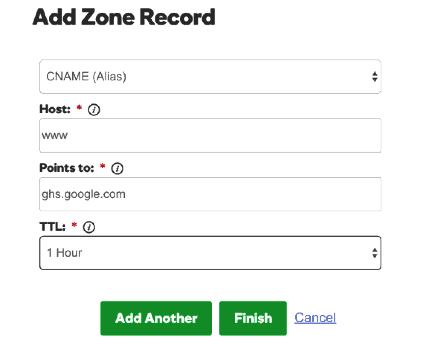 4. When you get the first record add and then click Add another record to add another to your Blogspot page.
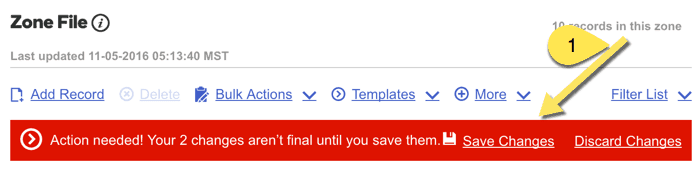
 5. When your Blogspot blog gets the record add then click finish. When you click on finish and then a page open in front of you will be in red color Click Save changes.
 If you then take it that you have all completed their half. If you are coming here to be a problem you can ask us to be free.
 4 times you will have to add a similar record. All things will be the same in just about every record in Record "Points to" be in the 4 to different IP address add. 4 different IP Address is given below!
216.239.32.21
216.239.34.21
216.239.36.21
216.239.38.21
2. When you go to the last record add 4 record add After clicking finish. 4 record add all your will and then have something like this screenshot show.
4 times you will have to add a similar record. All things will be the same in just about every record in Record "Points to" be in the 4 to different IP address add. 4 different IP Address is given below!
216.239.32.21
216.239.34.21
216.239.36.21
216.239.38.21
2. When you go to the last record add 4 record add After clicking finish. 4 record add all your will and then have something like this screenshot show.
 3. CNAME and A Record you have setup correctly! Now you must wait up to 4 hours to set and setting to work. Now you need to go to the dashboard of your Blogspot click save changes.
4. A Record Globally updated your CNAME and has been. Now your "We have not been able to verify your authority to this domain. Error 12. "error show will stop in and take your custom domain to work.
3. CNAME and A Record you have setup correctly! Now you must wait up to 4 hours to set and setting to work. Now you need to go to the dashboard of your Blogspot click save changes.
4. A Record Globally updated your CNAME and has been. Now your "We have not been able to verify your authority to this domain. Error 12. "error show will stop in and take your custom domain to work.
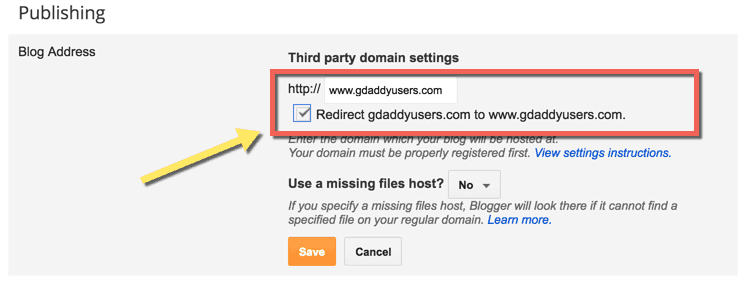
 5. After you are all having no error then it means you must wait a few more hours. If your custom domain work will start to show something like this will happen as shown in the screenshot.
The last thing you will have to thing after another, as is shown in the bottom of the screenshot, blog address and Edit the "Redirect xxxx.com to www.xxxx.com" on the Tick give and click on save.
5. After you are all having no error then it means you must wait a few more hours. If your custom domain work will start to show something like this will happen as shown in the screenshot.
The last thing you will have to thing after another, as is shown in the bottom of the screenshot, blog address and Edit the "Redirect xxxx.com to www.xxxx.com" on the Tick give and click on save.
 You have now completed all the step! You add your custom domain name to point to have in Blogspot. The whole process has to complete a technical term. But once you follow these step in the right way and you will have it very cheaply ways.
If your blog on Blogspot, and the long time you want to use your blog! So I highly recommend that you come! Using custom domain name of your blog give your blog a professional look.
If you have any problem of any kind in the whole process and you have come to help you and your problem feel free to ask in the comment box.
If you enjoyed this tutorial and you got some learning you share this post with your friends on facebook to not miss
You have now completed all the step! You add your custom domain name to point to have in Blogspot. The whole process has to complete a technical term. But once you follow these step in the right way and you will have it very cheaply ways.
If your blog on Blogspot, and the long time you want to use your blog! So I highly recommend that you come! Using custom domain name of your blog give your blog a professional look.
If you have any problem of any kind in the whole process and you have come to help you and your problem feel free to ask in the comment box.
If you enjoyed this tutorial and you got some learning you share this post with your friends on facebook to not miss
Blogspot blog Complete Guide to setup the Custom Domain Name
Blogspot blogs to custom domain name setup the first thing you have to do it before you have to buy a domain name. A charge of domain Rs.199 - Rs. 8000 can be. For a year, so the first thing you should buy a domain name. If you have not purchased the domain name before, you should read these posts. How to buy a domain name is because this post! There is information about the whole. Domain Name for Your Website HOW TO PURCHASE I recommend that you read this post and decide to Kruga to which the domain name you want to buy. I highly recommend you buy a domain name, when Kruga whenever the ".com" domain as purchased. ".com" Domain (.info, .org, .net) is considered good and professional. Once you get your domain name decide then you Godaddy going to buy it. Godaddy to buy the domain name will take you more than 5 minutes. If you bought a domain name, so now we will learn how to setup your it to your Blogspot blog.How to Add Custom Domain Name in the Blogspot Blog
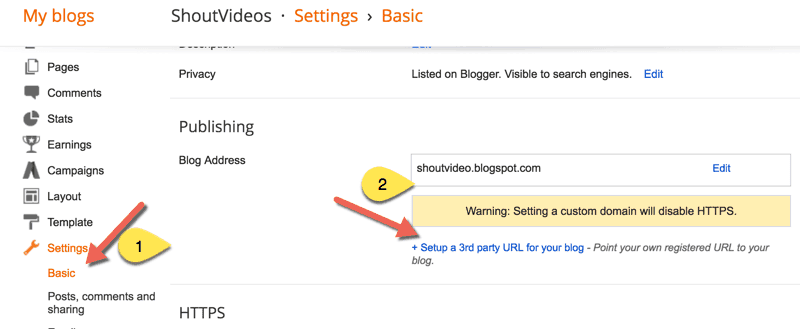
The First Step is where you need to add your register domain name to your blog.- First, login to your Blogspot blog on BlogSpot Dashboard and go! Then Settings> Basic clicks, then the Blog address> + Setup a 3rd party URL for your blog: will appear.
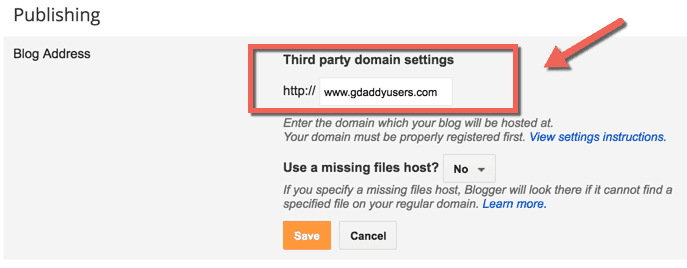
2. This is the place where you bought your domain add up to "+ Setup a 3rd party URL for your blog," Click. Register your domain name and have to add on there.
3. NAME your domain WWW such as the need to add is shown in Screenshot.
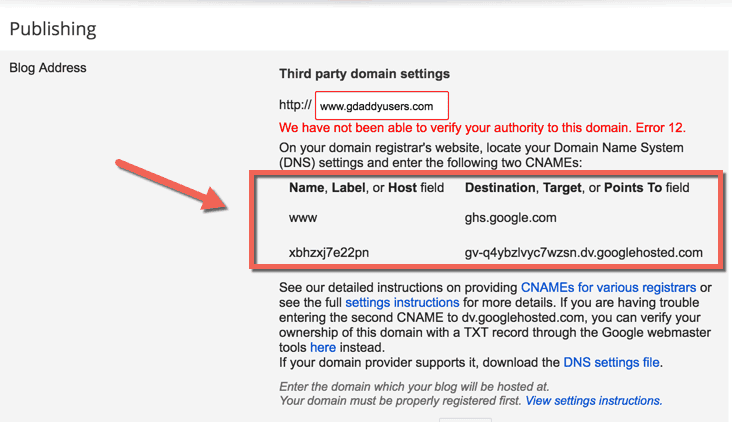
4. Once you have your domain Register NAME www click on the save and then you add an ERROR saying "We have been able to verify your Authority Not to this domain. Error 12 .. " will appear and you will see 2 CNAME Record! As is visible in the screenshot.
5. Now you domain register where you did! There's something to be login to the domain control panel after changing the setting on your custom domain name Blogspot would setup.
6. The next step now is to turn this post where you setup your custom domain name to the Blogspot blog and follow the step to do.
And to setup the CNAME Record at Godaddy
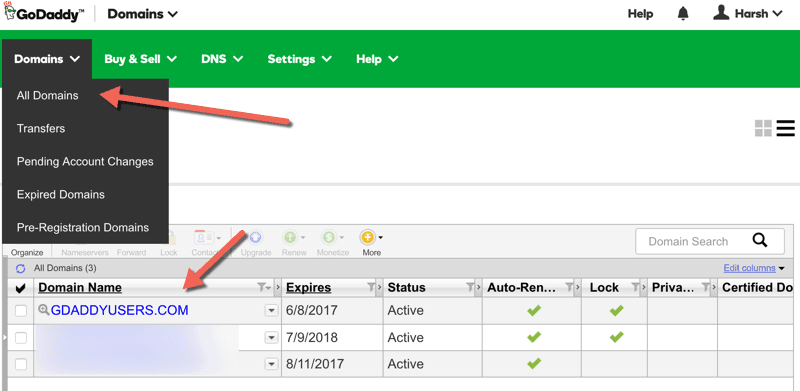
1. Godaddy going to the official website to login and go to Godaddy account Dashboard manage domains click. See the screenshot below for better understanding. You have to register the domain name by clicking on the Manage domain page should be on.
2. Next page in the DNS zone file by clicking the Click Add Record.
3. Add Record Clicking on that will open a new page. CNAME Record Select it, and screen show your Blogspot blogs are here to add to the record. To understand better the view image screenshot.
4. When you get the first record add and then click Add another record to add another to your Blogspot page.
5. When your Blogspot blog gets the record add then click finish. When you click on finish and then a page open in front of you will be in red color Click Save changes.
If you then take it that you have all completed their half. If you are coming here to be a problem you can ask us to be free.
Domain DNS Add in you to
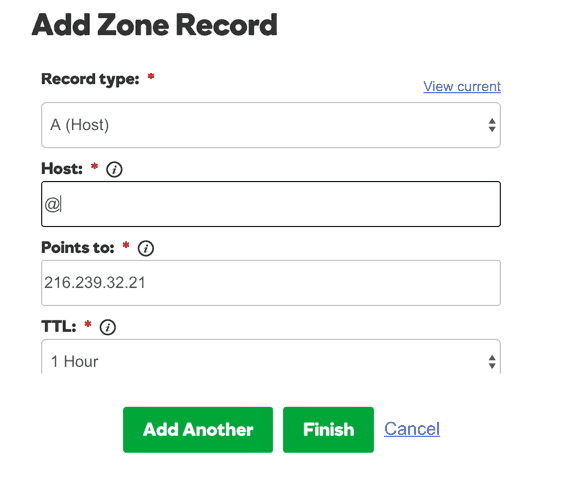
This is your last step where you 4 IP Address in A Record must add. The process is almost the same as the above process. In it you "CNAME" in place of "A (Host)" to select. 1.First click Add Record Record Type then the A (Host) All you need to select and Host "@" will write the "Points to" the 216.239.34.21 add Another click typing!
4 times you will have to add a similar record. All things will be the same in just about every record in Record "Points to" be in the 4 to different IP address add. 4 different IP Address is given below!
216.239.32.21
216.239.34.21
216.239.36.21
216.239.38.21
2. When you go to the last record add 4 record add After clicking finish. 4 record add all your will and then have something like this screenshot show.
3. CNAME and A Record you have setup correctly! Now you must wait up to 4 hours to set and setting to work. Now you need to go to the dashboard of your Blogspot click save changes.
4. A Record Globally updated your CNAME and has been. Now your "We have not been able to verify your authority to this domain. Error 12. "error show will stop in and take your custom domain to work.
5. After you are all having no error then it means you must wait a few more hours. If your custom domain work will start to show something like this will happen as shown in the screenshot.
The last thing you will have to thing after another, as is shown in the bottom of the screenshot, blog address and Edit the "Redirect xxxx.com to www.xxxx.com" on the Tick give and click on save.
You have now completed all the step! You add your custom domain name to point to have in Blogspot. The whole process has to complete a technical term. But once you follow these step in the right way and you will have it very cheaply ways.
If your blog on Blogspot, and the long time you want to use your blog! So I highly recommend that you come! Using custom domain name of your blog give your blog a professional look.
If you have any problem of any kind in the whole process and you have come to help you and your problem feel free to ask in the comment box.
If you enjoyed this tutorial and you got some learning you share this post with your friends on facebook to not miss


No comments